
When it comes to increasing your bathroom's aesthetic appeal, consider several ideas. One of the many ways to do that is by considering looking at LED bathroom mirrors. In case you don't know, light-emitting diode (LED) mirrors are equipped with LED bulbs.
There are two different ways of installing LED Bathroom mirrors in your home. The first method involves buying a ready-made LED mirror and then fixing it inside your bathroom. Alternatively, you may decide to install light-emitting diode bulbs directly on your pre-existing bathroom mirror. The only difference between the two methods is that most ready-made LED mirrors often come with built-in anti-fog features. The offering ensures that your looking glass is clean and free of fog.
In the rest of this post, you'll learn how to use both methods to install LED bathroom mirrors in your home. That said, without further ado, let's get straight down to business.
How Do You Install LED Lights In A Bathroom Mirror?
As earlier stated, light-emitting diode mirrors are glasses equipped with LED bulbs. They offer several different benefits. One of them is that they provide ambient lighting, which can improve your bathroom's aesthetic look. Furthermore, LED mirrors can also help to lower your energy bills. That's so because light-emitting diode bulbs use less energy and tend to last longer.
That said, let's have a quick look at the steps involved in the first method; installing LED lights in your mirror.
Step #1: Prepare the materials
The first step in installing LED lights in a mirror is to get all the materials ready. The main items that you'll need for this process include your bathroom mirror. Other materials include LED strip lights, a power supply unit, connectors, tape, and a measuring ruler.
After getting the materials ready, proceed to measure the square or rectangular mirror. This measurement aims to determine the length of each side of the mirror you want to put the lights on.
Step #2: Installation
The assumption is that you already have all the materials ready. Next, you need to start the installation process. Start by cutting the length of strip light you need. It will be according to the measurements earlier taken.
After that, clean the glass surface - doing that will enable strip lights to stick better on the mirror. Next, carefully peel off the adhesive backing from the strip lights and fit them one at a time on the glass surface. Furthermore, for better results, ensure you take the time to tape down the strips.
Step #3: Connect the strip lights to the power supply unit
The third step involves connecting the strip lights to a power supply unit. If you don't know much about that, you can always read about it online.
Step #4: Run a test on the lighted mirror
After connecting the LED strip lights to the power supply, the next thing is to test the setup. All you need to do is to plug the power supply unit into a nearby electrical outlet.
Different LED Bathroom Looking Glass Ideas
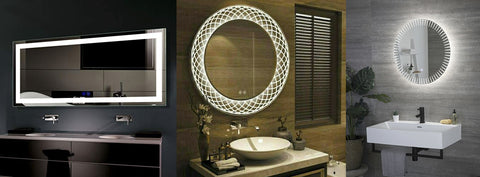
Since you're planning to enhance your bathroom's aesthetic appeal. Try the below ideas to achieve your goals.
-
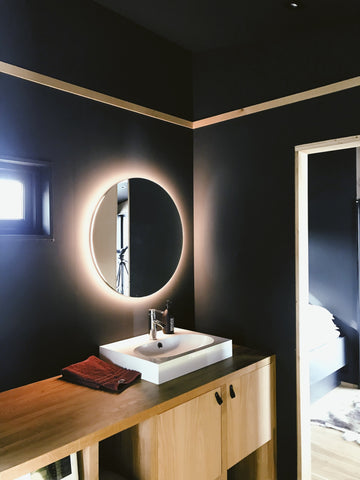
Backlit Mirror
Backlit mirrors are the looking glass usually installed in bathrooms. They earned the name "backlit" because they utilize LED lighting tubes installed right at the mirror's back.
-
Vanity Light Above Bathroom Mirror
Another great idea is to buy vanity lights and place them right above your bathroom mirror. There are a variety of bathroom vanity lighting options available. One of the top options includes Bar and Sconce vanity lighting. However, all of them offer similar results - helping you keep your bathroom lit and beautiful.
-
Round Lighted Vanity Bathroom Mirror
When it comes to beautifying your bathroom, consider buying a round lighted vanity mirror. One of the prime benefits is that it magnifies the spaciousness of your bathroom.
Step By Step Guide To Installing LED Bathroom Mirrors

There are a few steps involved in installing a new LED mirror in your bathroom. The most crucial aspect is that you need to opt for the best-lighted bathroom mirror. You also need a drill, laser level, measuring tape, pencil, stud finder, screwdriver, screws, and brackets. Once everything is ready, it's time to get to work.
Step #1: Measurement
To start the installation process, you need to unwrap the newly purchased LED mirror and take its measurement. Then check the product's manual for instructions on how to fit the glass for better results. Next, you need to drill holes on the wall for brackets, using the mirror's measurement.
Step #2: Fix the wall brackets
After drilling the holes, what's next is to fix the brackets on the wall. You can check your manual to see if there's any instruction on how to do it. However, if there's none, you can follow these steps.
First, position the brackets on each point drilled and insert dowels and screws. After that, the next thing is to lock the clamps.
Step #3: Mount the LED mirror on the anchors
The third step involves placing the mirror on the brackets to check whether the installation is perfect. Once that's settled, you need to start connecting electrical power to it. Ensure you plug the power supply unit of the LED bathroom mirror into the electrical outlet close to it.
That's all about the installation process of the best-lighted bathroom mirror.
Step #4: Test The LED Mirror
Test the mirror to see it's in perfect condition, then start using it as you want.
Conclusion
So far, you should know about two different techniques to use a LED bathroom mirror in your home. The first method involves placing LED lights on your square or rectangle "looking glass."
The second step addresses how you can install a ready-made LED mirror. To achieve better results, you need to opt for the best-lighted bathroom mirror. You can check here to browse the best-selling LED mirrors for your bathroom.